From Zero to Pipeline: Running dbt Core on DigitalOcean
This guide walks you through building a fully working dbt transformation pipeline on DigitalOcean: from provisioning infrastructure to running your first models. By the end, you'll have dbt Core installed on an Ubuntu Droplet, connected to a Managed PostgreSQL database over a private VPC network, and a live dbt docs site showing your model lineage.
What you'll build:
- A DigitalOcean Droplet (Ubuntu 24.04) running dbt Core
- A Managed PostgreSQL 18 database in the same VPC
- A
jaffle_shopdbt project with two models and passing data tests - An auto-generated dbt docs site with a lineage graph
Prerequisite:
- A DigitalOcean account
- Basic familiarity with the Linux command line
Time to complete: approximately 45 minutes
Cost: approximately $19.15/month while the infrastructure is running ($4/mo Droplet + $15.15/mo Managed PostgreSQL)
How dbt works on DigitalOcean
Before touching any infrastructure, it helps to understand what each component does and why they're configured the way they are.
dbt (data build tool) is a command-line tool that runs SQL transformations against a database. It doesn't store data itself — it sits between your code and your database, compiling SQL models and executing them in the right order. This means dbt needs two things: a machine to run on (your Droplet) and a database to write results into (Managed PostgreSQL).
The reason both resources live in the same DigitalOcean region and VPC is private networking. When your Droplet connects to PostgreSQL over the private VPC hostname instead of the public internet, traffic never leaves DigitalOcean's internal network. This is faster, cheaper (no egress fees), and more secure. It's also why the database's trusted sources configuration matters — it ensures only your specific Droplet can reach the database.
Part 1: Provision your infrastructure
Step 1: Create the Droplet
In the DigitalOcean control panel, create a new Droplet with the following settings:
- Image: Ubuntu 24.04 (LTS) x64
- Size: Basic / Shared CPU — 1 vCPU / 512 MB RAM ($4/mo)
- Region: New York 1 (NYC1)
- VPC Network: default-nyc1
- Authentication: SSH key or password (your preference)
Once created, the Droplet overview page confirms the resource is active and shows both a public IPv4 address and a private IP on the 10.x.x.x range.
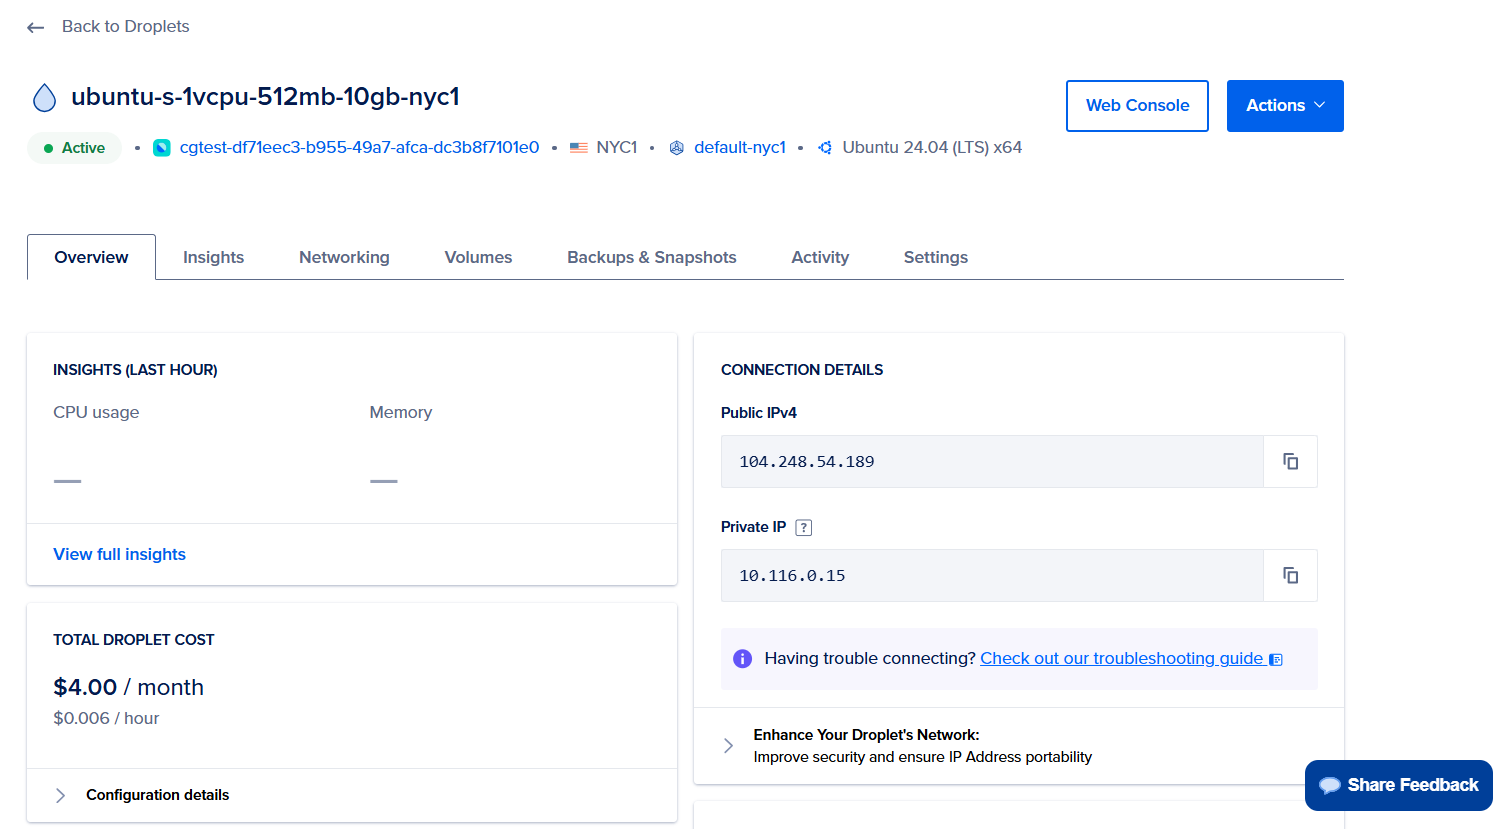
The private IP (10.116.0.15 in this example) is what the database will eventually use to identify and trust this Droplet. Keep this page open — you'll reference it in a later step.
Note: Why 512 MB RAM? The $4/mo Droplet has 512 MB of RAM, which is tight for Python package installation. You'll add a swap file in Part 2 to give the system headroom during the dbt install. It keeps costs low and shows a real-world constraint that developers might encounter on budget.
Step 2: Create the Managed PostgreSQL database
Navigate to Databases → Create Database Cluster and configure it as follows:
- Engine: PostgreSQL 18
- Edition: Standard
- Plan: Basic / Shared CPU / 1 GB RAM / 10 GiB SSD ($13/mo)
- Storage autoscaling: enabled (increases by 10 GiB when usage hits 80%)
- Region: New York 1 (NYC1) — must match your Droplet
- VPC Network: default-nyc1 — must match your Droplet
- Cluster name:
dbt-portfolio-db - Project: assign to your existing project
Click Create Database Cluster. Provisioning takes 2–3 minutes.
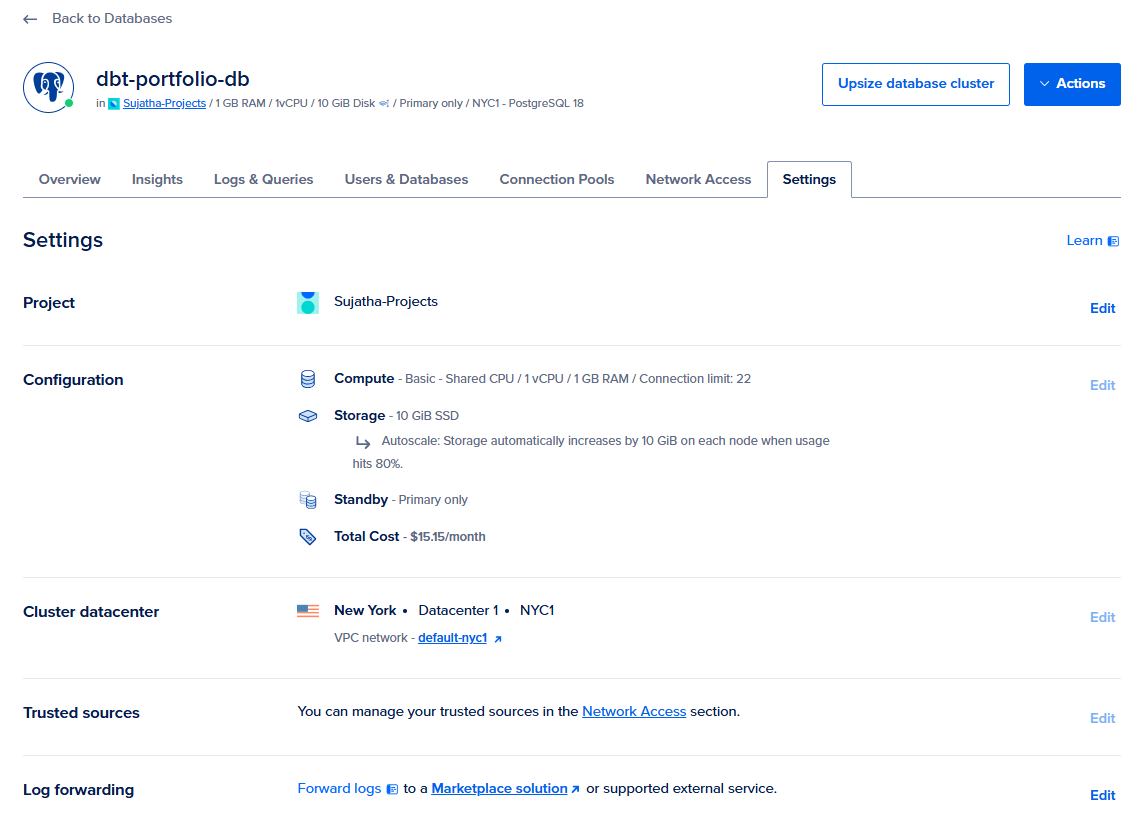
What provisioning does: When you click create, DigitalOcean allocates a virtual machine, installs and configures PostgreSQL 18, generates SSL certificates for encrypted connections, formats the SSD storage, and assigns the cluster a private hostname inside your VPC. The database is not usable until all of these steps complete and the status badge turns green.
Step 3: Add your Droplet as a trusted source
Once the database is active, navigate to Network Access → Add Trusted Sources. Select your Droplet by name. This restricts inbound database connections to your Droplet's private IP only.
Because both resources share the default-nyc1 VPC, the connection between them travels over DigitalOcean's internal network rather than the public internet. No public IP or SSL certificate verification is required for the connection itself, though PostgreSQL still enforces credential authentication.
Step 4: Collect your connection details
On the database Overview page, click the VPC network tab in the Connection Details panel. Note these values — you'll need them when configuring dbt:
| Parameter | Value |
|---|---|
host | private-dbt-portfolio-db-do-user-XXXXXXXX-0.j.db.ondigitalocean.com |
port | 25060 |
user | doadmin |
password | (click "show" to reveal) |
database | defaultdb |
Note: Use the VPC network hostname, not the public one The connection details panel shows two tabs: Public network and VPC network. Always use the VPC network hostname when connecting from a Droplet in the same region. The public hostname routes traffic over the internet and counts against your bandwidth.
Part 2: Prepare the Droplet
Open the Droplet's Web Console from the DigitalOcean control panel. All commands in this section run as root inside that terminal.
Step 5: Check baseline memory and disk
Before installing anything, confirm what resources you have available:
free -h
df -h /

The output confirms:
- RAM: 458 MB total, ~308 MB available
- Swap: none configured
- Disk: 8.7 GB total, 6.8 GB free
458 MB of RAM is not enough for pip to install dbt's dependency tree without hitting an out-of-memory error. The next step adds a swap file to provide additional virtual memory backed by disk.
Step 6: Configure swap
Run these commands in sequence:
fallocate -l 1G /swapfile
chmod 600 /swapfile
mkswap /swapfile
swapon /swapfile
echo '/swapfile none swap sw 0 0' >> /etc/fstab
What each command does:
fallocateallocates a 1 GB file on diskchmod 600restricts access to root only (required by the kernel)mkswapformats the file as a swap partitionswaponactivates it immediately- The
echoline adds an entry to/etc/fstabso swap persists across reboots
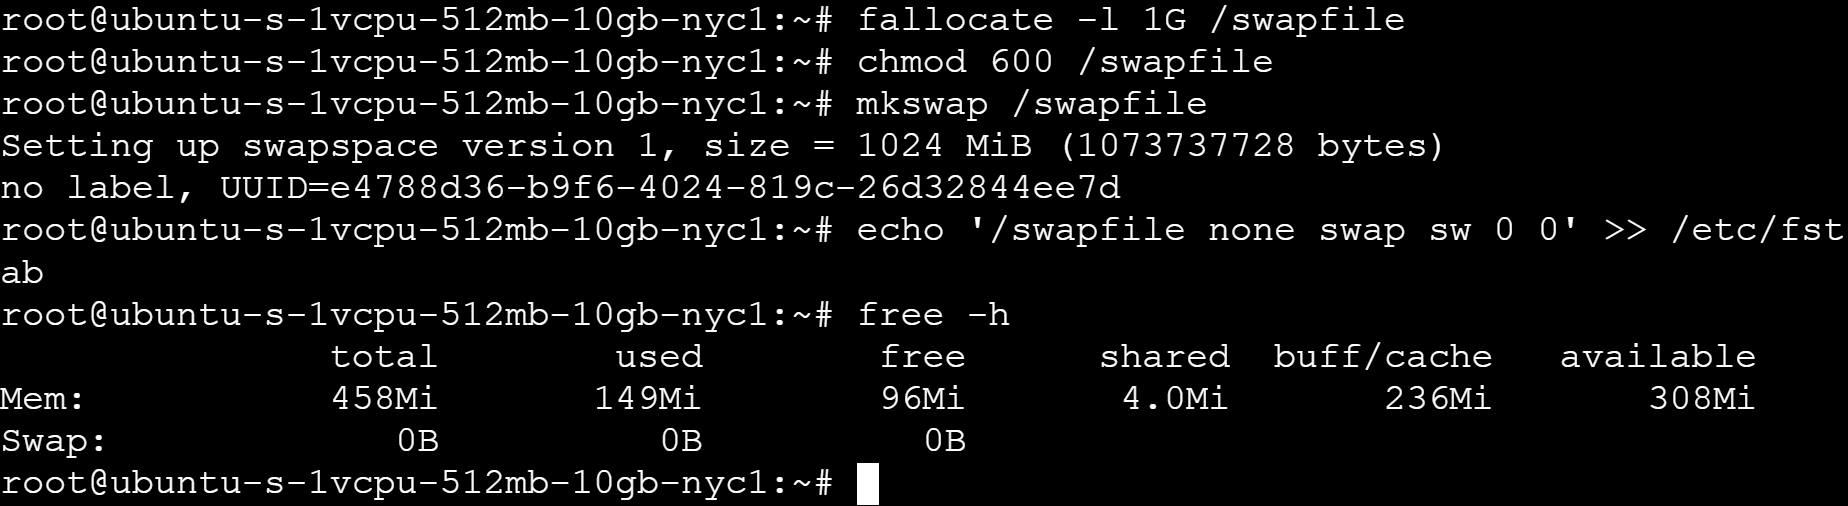
Verify swap is active:
free -h

The Swap row now shows 1.0 Gi total and 1.0 Gi free. The system has 1.5 GB of addressable memory for the dbt installation.
Step 7: Install Python
Update the package index, then install Python and the virtual environment tooling:
apt update && apt upgrade -y
apt install -y python3-pip python3-venv python3-full
The apt upgrade step may prompt you about the OpenSSH server configuration file. Select keep the local version currently installed and press Enter to continue.
Verify the Python version:
python3 --version

Python 3.12.3 is installed. dbt Core 1.12 requires Python 3.8 or higher, so this version is fully compatible.
Part 3: Install dbt Core
Step 8: Create a virtual environment and install dbt-postgres
On Ubuntu 24.04, pip installs directly to the system Python are intentionally blocked. Use a virtual environment instead:
python3 -m venv /opt/dbt-env
source /opt/dbt-env/bin/activate
Your prompt changes to (dbt-env) to indicate the virtual environment is active. All subsequent Python and pip commands run inside this isolated environment.
Install dbt Core with the PostgreSQL adapter:
pip install dbt-postgres
This installs dbt Core and all its dependencies, including psycopg2-binary (the Python PostgreSQL driver), jinja2 (dbt's templating engine), and sqlglot (SQL parsing). The install takes 2–4 minutes on this Droplet.
When complete, the terminal shows a Successfully installed line listing every package. The key ones to confirm:
dbt-core-1.12.0b1dbt-postgres-1.10.0psycopg2-binary
Step 9: Verify the installation
dbt --version
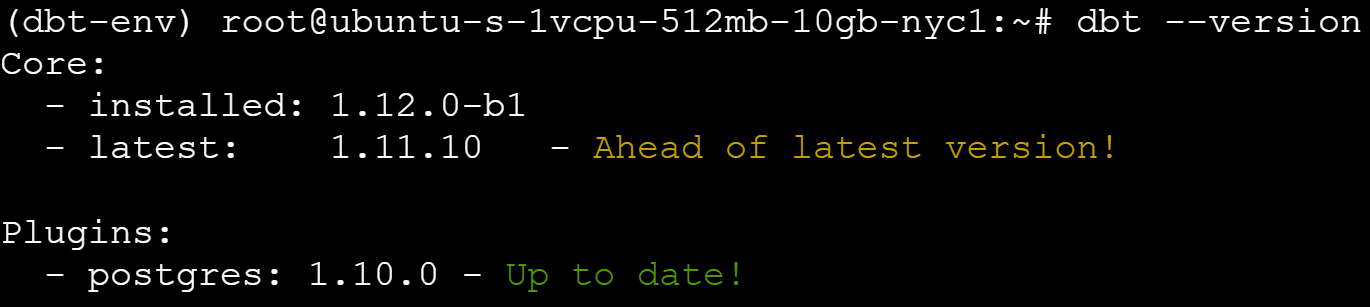
The output confirms:
- dbt Core: 1.12.0-b1 (ahead of the stable release — this is the latest beta)
- postgres plugin: 1.10.0, marked "Up to date"
The (dbt-env) prefix on the prompt confirms the virtual environment is active and the correct dbt binary is being used.
Part 4: Initialize the dbt project
Step 10: Run dbt init
Navigate to your home directory and initialize a new project:
cd ~
dbt init jaffle_shop
jaffle_shop is the canonical dbt sample project name, used across the dbt community and official documentation.
The dbt init command opens an interactive setup prompt. Enter the following values:
Which database would you like to use?
[1] postgres
Enter a number: 1

host: private-dbt-portfolio-db-do-user-XXXXXXXX-0.j.db.ondigitalocean.com
port [5432]: 25060
user: doadmin
pass: <your database password>
dbname: defaultdb
schema: jaffle_shop
threads [1]: 1
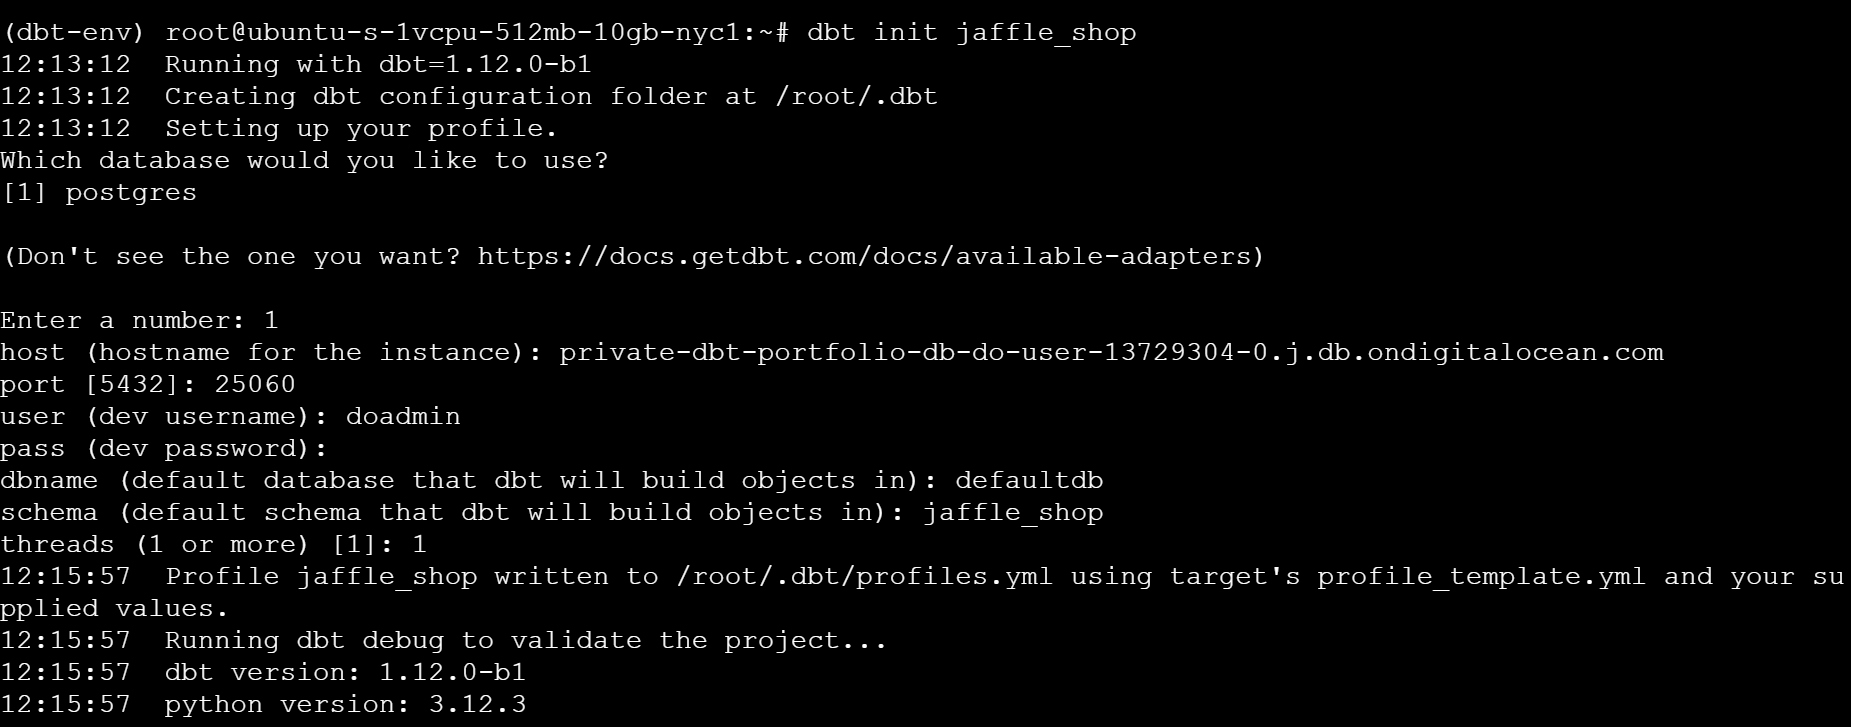
After you enter these values, dbt automatically runs dbt debug to validate the connection before creating the project.
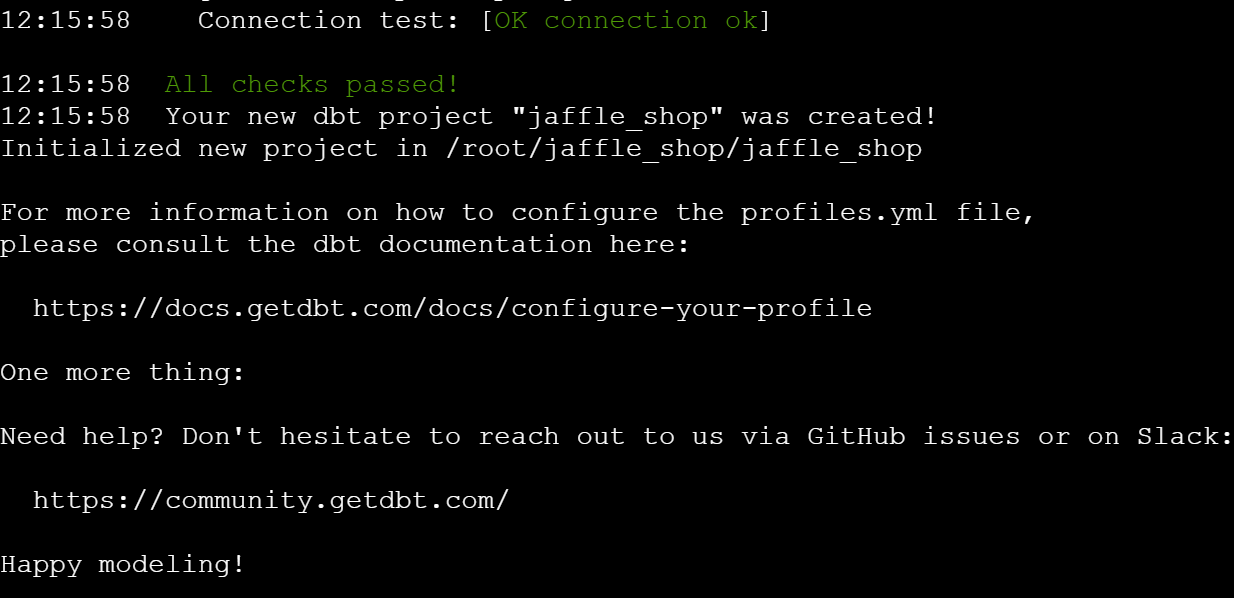
All checks passed! confirms that:
- dbt can resolve the private VPC hostname
- The PostgreSQL credentials are valid
- The
defaultdbdatabase is accessible - The
jaffle_shopschema can be created
The project files are written to /root/jaffle_shop/.
Note: What profiles.yml does?
During dbt init, dbt writes your connection configuration to /root/.dbt/profiles.yml. This file maps your project name to a database connection. It lives outside the project directory intentionally, so you can commit your project to version control without exposing database credentials.
Part 5: Run your first models
Step 11: Run dbt
Navigate into the project directory and execute the default models:
cd ~/jaffle_shop
dbt run
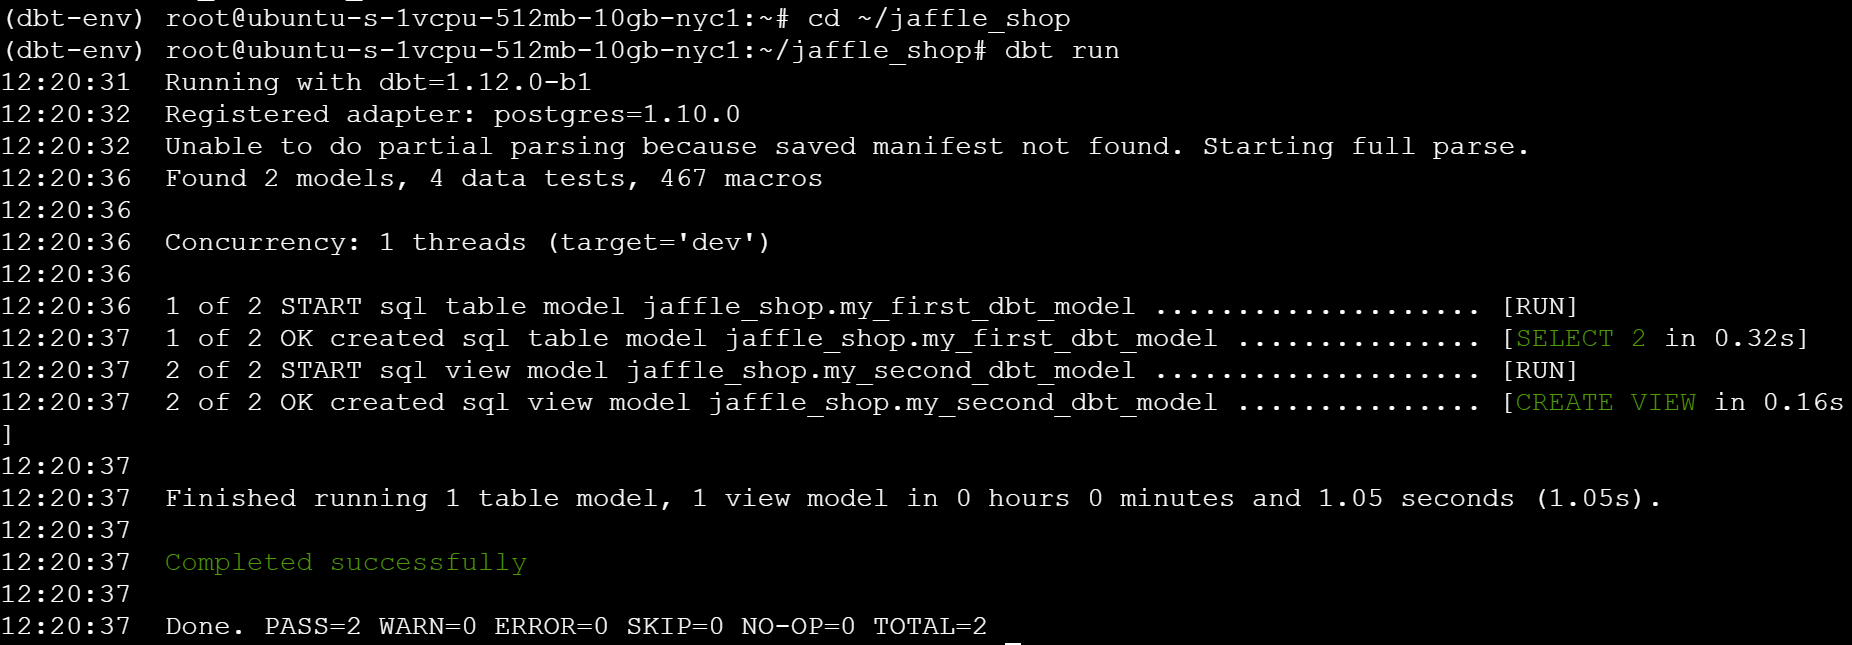
dbt discovers 2 models and runs them in dependency order:
my_first_dbt_model — materialised as a table in defaultdb.jaffle_shop. dbt executes a SELECT statement and writes the results as a permanent table. This takes 0.32 seconds.
my_second_dbt_model — materialised as a view that selects from my_first_dbt_model. dbt issues a CREATE VIEW statement rather than materialising the data again. This takes 0.16 seconds.
The final summary line — PASS=2 WARN=0 ERROR=0 — confirms both models built without issues.
What just happened: dbt compiled Jinja-templated SQL files in your models/ directory into raw SQL, connected to defaultdb over the private VPC connection, executed each statement in the correct order, and wrote results back to the database. The entire pipeline ran in 1.05 seconds.
Part 6: Generate and explore dbt documentation
Step 12: Generate docs
dbt docs generate
This command inspects your project — models, sources, tests, column descriptions — and compiles everything into a static documentation site. It writes the output to the target/ directory inside your project.
Step 13: Serve the docs site
dbt docs serve --host 0.0.0.0 --port 8080
Open a browser and navigate to http://<your-droplet-public-ip>:8080.
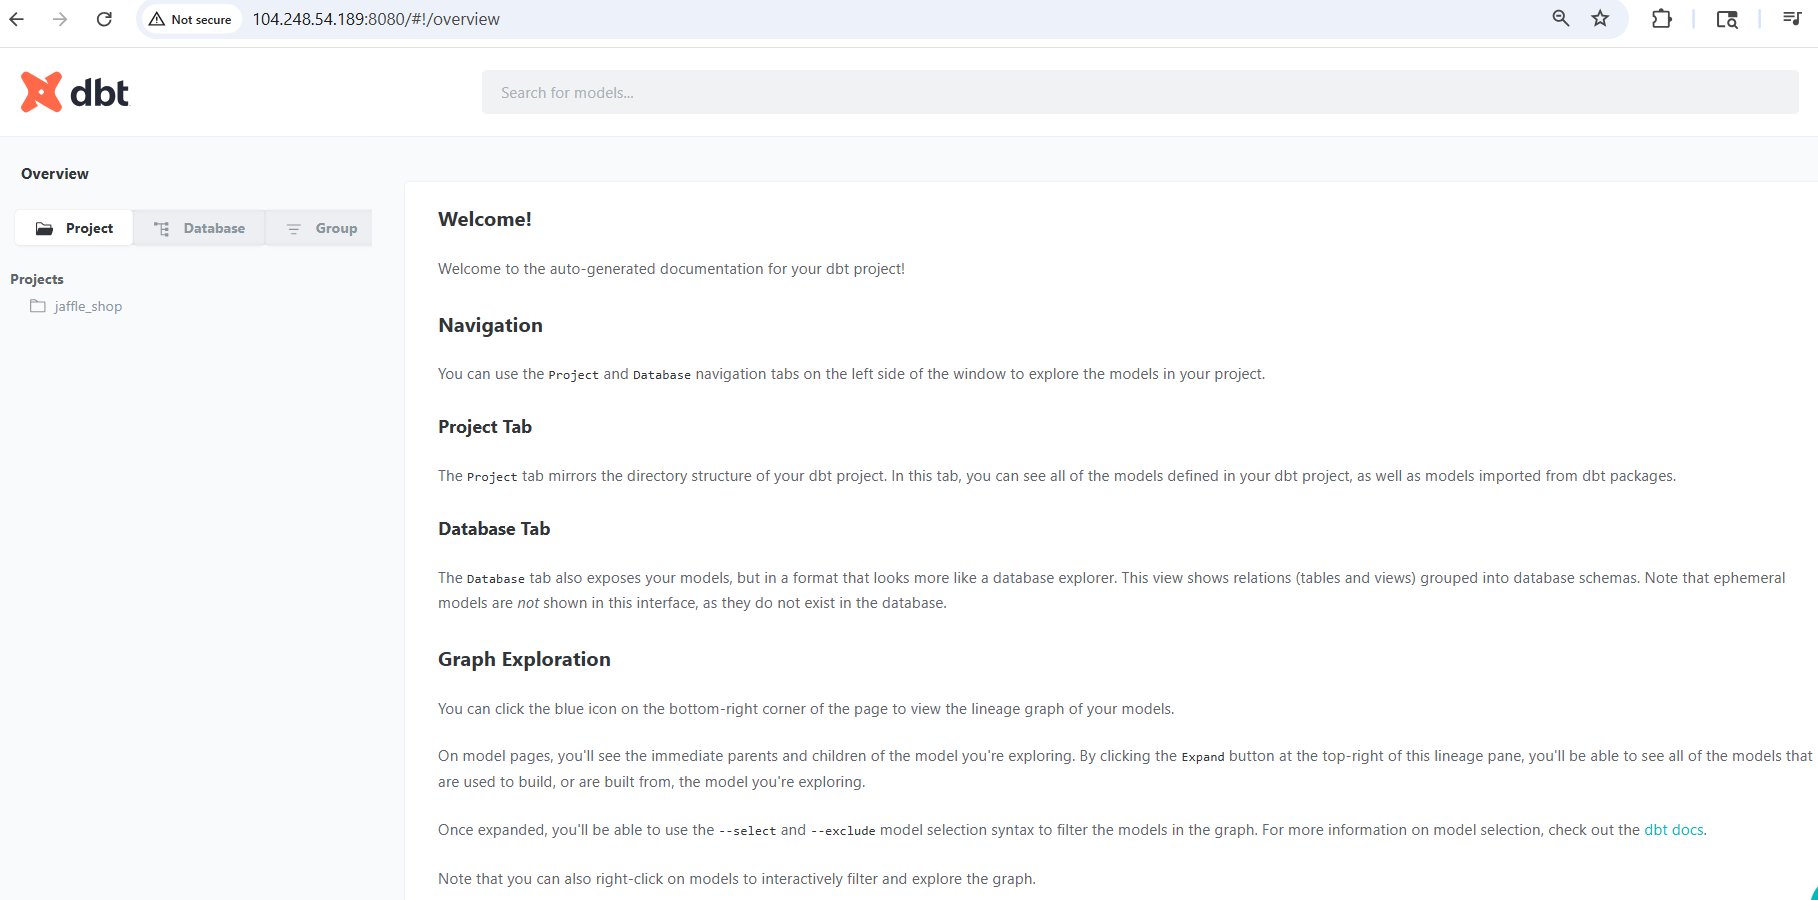
The dbt docs site gives you three views of your project:
Project tab mirrors your project's directory structure, showing models grouped by folder. Click any model to see its details.
Database tab shows your models as they exist in PostgreSQL — grouped by schema, with table and view types displayed.
Lineage graph shows the dependency relationships between models as a directed acyclic graph (DAG).
Step 14: Explore model documentation
Click my_first_dbt_model in the left sidebar.
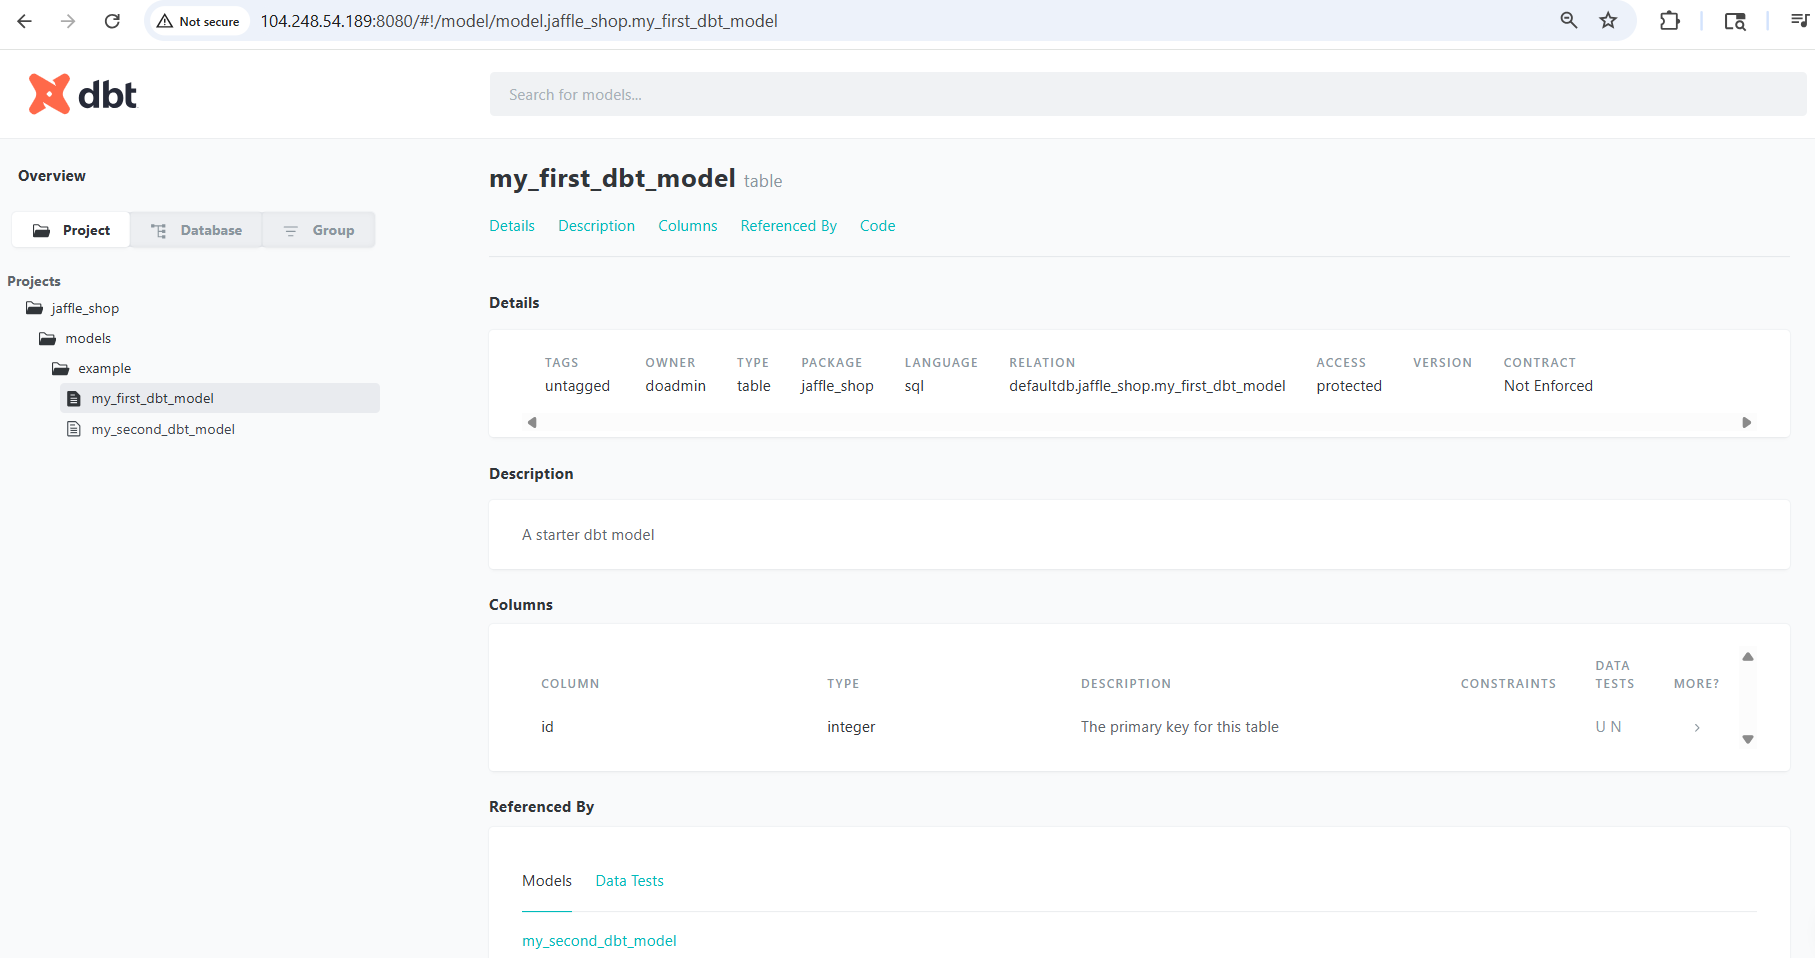
The model detail page surfaces metadata that would otherwise require querying information_schema directly:
- Type:
table— this model is materialised as a permanent table - Relation:
defaultdb.jaffle_shop.my_first_dbt_model— the full qualified name in PostgreSQL - Owner:
doadmin— the database user that ran the model - Referenced By:
my_second_dbt_model— confirming the downstream dependency
Click my_second_dbt_model to see the downstream model.
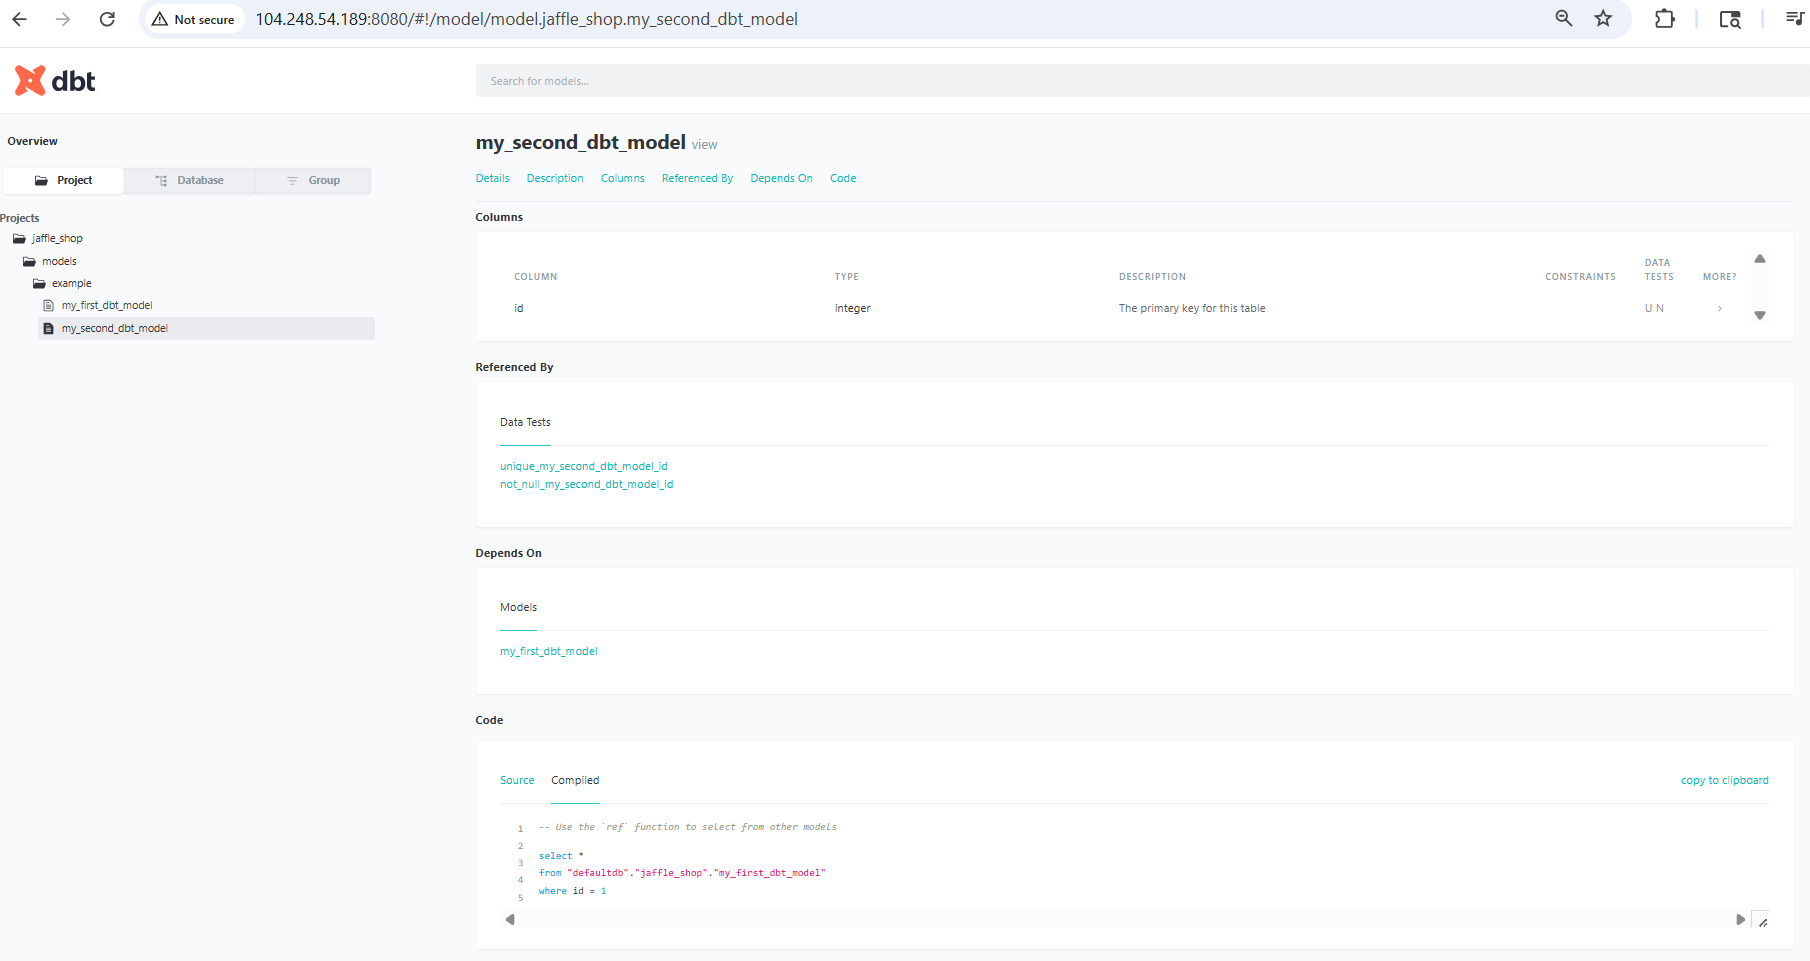
This page shows the full picture of the model:
- Type:
view— not materialised as a table, recalculated on every query - Data Tests:
unique_my_second_dbt_model_idandnot_null_my_second_dbt_model_id— dbt automatically applied tests defined in the project's schema YAML - Depends On:
my_first_dbt_model— the explicit upstream dependency - Compiled SQL: the Code tab shows the resolved SQL that dbt sent to PostgreSQL, with
ref()macros replaced by fully qualified table names
Step 15: View the lineage graph
Click the graph icon in the bottom-right corner of any page to open the full lineage graph.
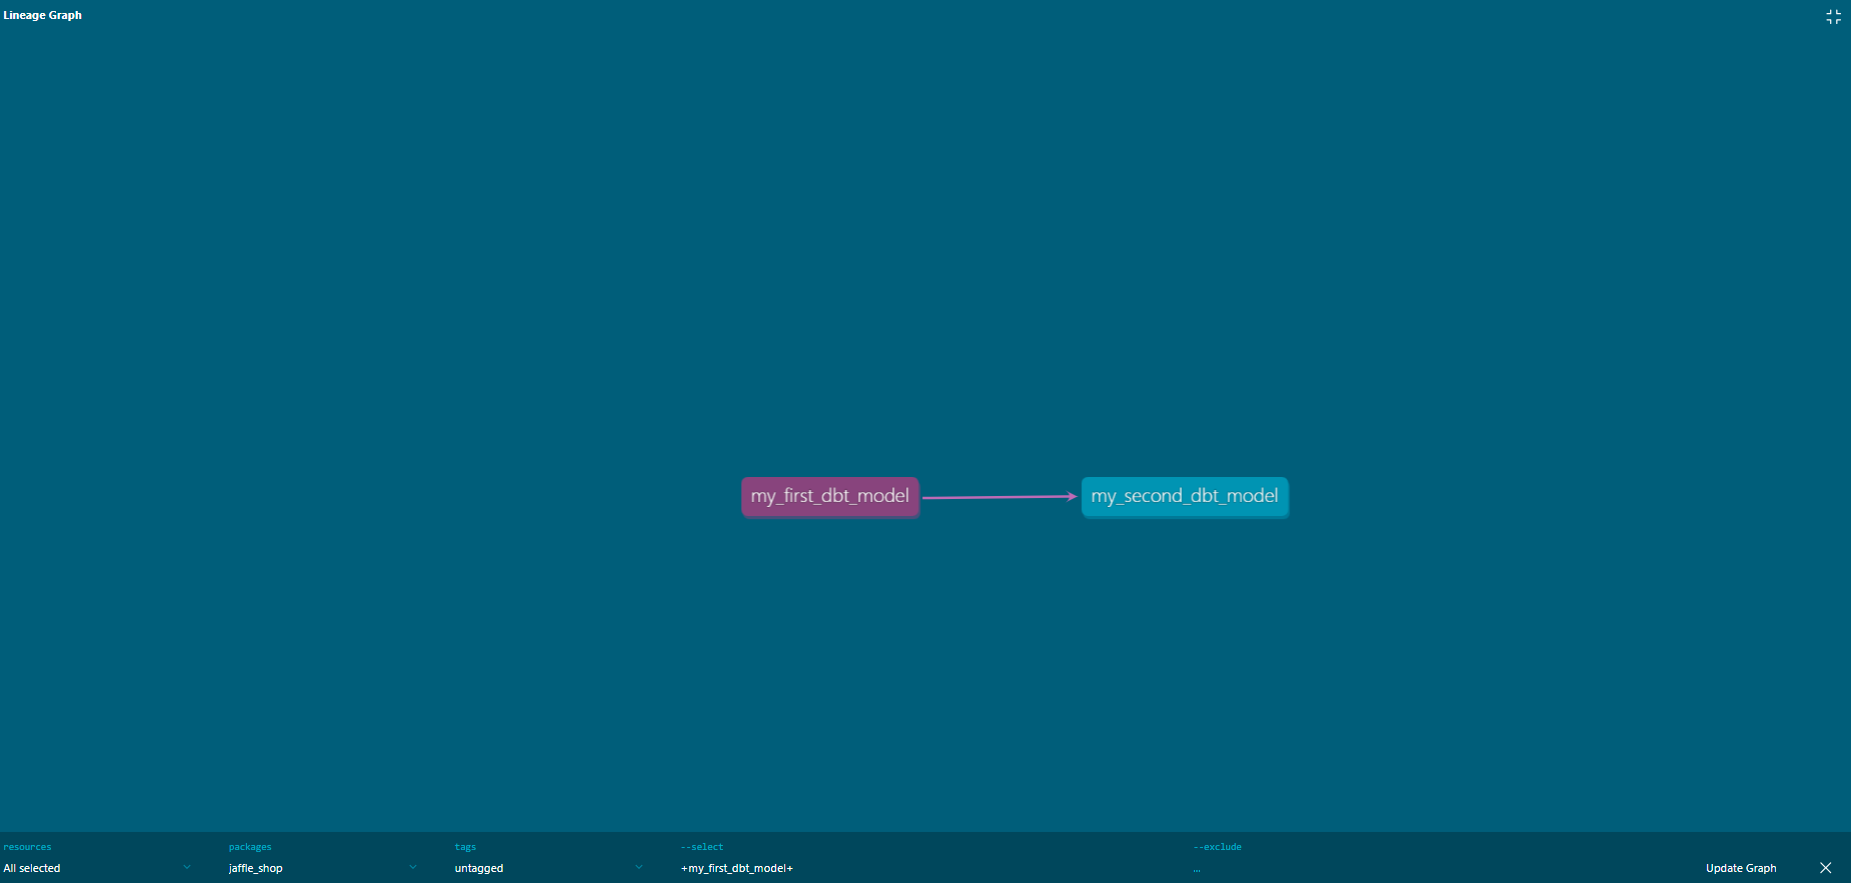
The DAG shows my_first_dbt_model → my_second_dbt_model. The arrow represents a ref() dependency — dbt guarantees that the upstream model always runs first, regardless of alphabetical or file order.
In larger projects with dozens or hundreds of models, this graph becomes the primary tool for understanding data flow, debugging failures, and planning refactors. dbt Labs builds significant product surface area around this view.
Press Ctrl+C in the terminal to stop the docs server when you're done.
What you built
You now have a working dbt pipeline running entirely on DigitalOcean infrastructure:
┌─────────────────────────────┐
│   Ubuntu 24.04 Droplet      │
│   NYC1 / default-nyc1 VPC   │
│                             │
│   Python 3.12 venv          │
│   dbt Core 1.12             │
│   dbt-postgres 1.10         │
│                             │
│   ~/jaffle_shop/            │
│   ├── models/               │
│   │   └── example/          │
│   │       ├── model_1.sql   │
│   │       └── model_2.sql   │
│   └── dbt_project.yml       │
└──────────┬──────────────────┘
           │ Private VPC
           │ port 25060
           │ SSL + credentials
           ▼
┌─────────────────────────────┐
│   Managed PostgreSQL 18     │
│   dbt-portfolio-db          │
│   NYC1 / default-nyc1 VPC   │
│                             │
│   defaultdb                 │
│   └── jaffle_shop schema    │
│       ├── my_first_dbt_model│
│       │   (table)           │
│       └── my_second_dbt_model│
│           (view)            │
└─────────────────────────────┘
The Droplet and database communicate exclusively over the private VPC — no traffic crosses the public internet. The trusted sources rule on the database ensures no other resource can connect, even within the same account.
What comes next
This setup is the foundation of a production-ready analytics engineering workflow.
Connecting real source data
The natural next layer is declaring upstream tables with source() so dbt can
track freshness, test completeness, and surface lineage back to the raw layer —
not just between models you build, but all the way to the data you ingest.
Adding depth to the project
As the project matures, the focus shifts to schema tests, column-level documentation, and custom materialisation strategies that reflect actual query patterns and cost constraints. These aren't optional polish — they're what separates a working pipeline from one a team can rely on.
Operationalising the pipeline
The next operational step is scheduling — running dbt run via cron or wiring
it into an Airflow DAG so the pipeline executes reliably without manual
intervention. This is where the Droplet-based setup earns its keep: a
persistent, always-on environment that can run on a schedule and alert on
failure.
Documentation as a data contract
At scale, the docs site generated in this guide becomes something more than a reference tool. When column descriptions, test results, and ownership metadata are maintained alongside the SQL, it functions as a living data contract — the kind that lets distributed teams trust data without chasing down the person who wrote the model six months ago.
Docs decisions
A few choices in this guide are worth calling out to understand the reasoning behind them.
Why jaffle_shop?
I used the canonical dbt sample project name rather than a custom one so you can cross-reference the official dbt documentation without mentally mapping between different model names. It also reflects how I think about docs: where community conventions exist, use them. Familiarity reduces cognitive load for the reader.
Why document the swap configuration?
A 512 MB Droplet is the lowest-cost entry point for this stack, and I chose it deliberately. Silently using a larger machine would have hidden a constraint that real practitioners hit all the time on budget infrastructure, shared CI runners, or resource-limited environments. The swap fix is non-obvious if you don't know to look for it. Documenting it is more useful than pretending the problem doesn't exist.
Why use the private VPC hostname?
The dbt init wizard defaults to localhost and doesn't surface the
difference between public and private hostnames. I chose the VPC hostname
explicitly because that decision matters in production (not just here). A guide
that glosses over it leaves readers with a working demo and a gap in their
understanding.
Why stop at two models?
This guide is about infrastructure and workflow, not dbt's full feature set.
The goal was a working dbt run with real results in the database and a live
docs site; the minimum pipeline that proves the stack end to end.
Going deeper here would have buried the setup story.